1 Trick To Strengthen Your Core Without Crunches: The Simple Plank Progression That Works In 8 Weeks
Crunches are familiar, easy to program, and they feel productive, but they often miss the mark when our goal is true, functional core strength. If we want a midsection that protects the spine, improves posture, boosts athleticism, and transfers force efficiently, we need movements that resist real-world forces, not just bend the spine over and over. That’s where the plank progression comes in: a simple, scalable system that teaches our core to prevent unwanted motion (especially extension), builds endurance and stiffness, and transfers directly to lifts and daily tasks. Over the next eight weeks, with small, measurable steps, we can transform how our core performs, no crunches required. We’ll explain why crunches fall short, show the exact progression (regressions and advanced options included), explain programming and tracking, and give the form cues and quick corrections that keep us safe and efficient. Ready? Let’s get into the method that actually works.
Why Crunches Aren’t The Best Way To Build Real Core Strength
Crunches are comfortable and familiar, but that’s part of the problem. They target the rectus abdominis through repeated flexion of the spine, which gives the sensation of “working the abs.” Yet the core’s primary job in most athletic and daily tasks is anti-extension, anti-rotation, and bracing under load, not repeated spinal curling. Here are the key limitations of crunches:
- Poor transfer to function: Crunches train spinal flexion in isolation. When we lift, carry, throw, or resist a sudden load, the core must stiffen and keep the spine neutral. Crunches don’t prioritize that.
- Risk of irritation: For people with a history of low-back pain or disc issues, repeated flexion can be provocative. Repeatedly bending and loading the spine under poor control increases risk.
- Limited loading potential: It’s hard to progressively overload a crunch in a meaningful, safe way. We can add weight behind the head, but that introduces awkward loading and often poor technique.
- Neglected stabilizers: Crunches largely ignore the deep stabilizers (transverse abdominis, obliques in anti-rotation roles, and the posterior chain’s role in resisting extension).
Contrast that with anti-extension training, where we teach the body to resist arching of the lower back under load. Anti-extension emphasizes creating a rigid, neutral torso under force. That stiffness is what protects the spine during heavy deadlifts, sprinting, overhead pressing, carrying children, or even coughing. We’re not saying crunches are evil, they can be used for conditioning or aesthetics, but if our goal is durable core strength that improves performance and lowers injury risk, there are better options.
Planks and their progressive variations target the core exactly where it matters. They demand sustained tension across the entire cylinder of the trunk, recruit the diaphragm and pelvic floor for coordinated bracing, and scale cleanly from bodyweight holds to weighted, loaded carries and dynamic anti-extension challenges. In short: planks teach our core to do what it actually needs to do.
The 1 Trick: Train Anti-Extension With A Progressive Plank-Based Approach
The single most effective trick we’ve found for building real core strength without crunches is to focus on anti-extension through a planned plank progression. That sounds simple because it is, simplicity is a strength here. Instead of random ab workouts, we follow a stepwise progression that prioritizes: tension quality, incremental overload, and movement specificity.
Why anti-extension? Because most common injuries or performance failures happen when the spine extends or the torso loses stiffness under load. Think of an athlete getting round-backed during a deadlift, or a parent vaping with a heavy stroller and feeling their lower back give out. Teaching the core to resist extension reduces those failure modes.
Our plank-based approach uses three pillars:
- Build the base: Focus on high-quality, time-under-tension holds with strict alignment and breathing/bracing. We’ll start with manageable durations and prioritize form over seconds.
- Progress load and complexity: Once we can hold a strict plank for a target time, we add graded challenge, longer holds, unilateral variations, incline-to-flat transitions, or external load. The progression is logical and measurable.
- Integrate into movement: We don’t stop at static holds. We carry the stability into anti-rotation, loaded carries, and compound lifts (front rack, overhead). The plank progression creates a foundation that transfers.
Example 8-week arc (illustrative):
- Weeks 1–2: Establish baseline, 3–4 sets of strict planks at 20–45 seconds with perfect form.
- Weeks 3–4: Increase time and add regressions/progression pairings (e.g., knee plank to full plank ladder).
- Weeks 5–6: Introduce loaded and unilateral challenges: one-arm plank holds, short weighted planks, or RKC-style harder bracing.
- Weeks 7–8: Consolidate with mixed sessions, long tension holds plus dynamic anti-extension work (ab wheel alternatives, kettlebell drag variations, heavy farmer carries).
The trick is consistency and measured overload. We’re not chasing gimmicks, we’re stacking small, reliable wins weekly. That steady tension adaptation leads to meaningful improvements in core stiffness, posture, and transferable strength within eight weeks.
How To Perform The Plank Progression Safely
A safe progression starts with perfect fundamentals: alignment, breathing/bracing, and honest self-assessment. We’ll run through step-by-step cues for the standard plank, then show how to regress or progress while maintaining safety and quality.
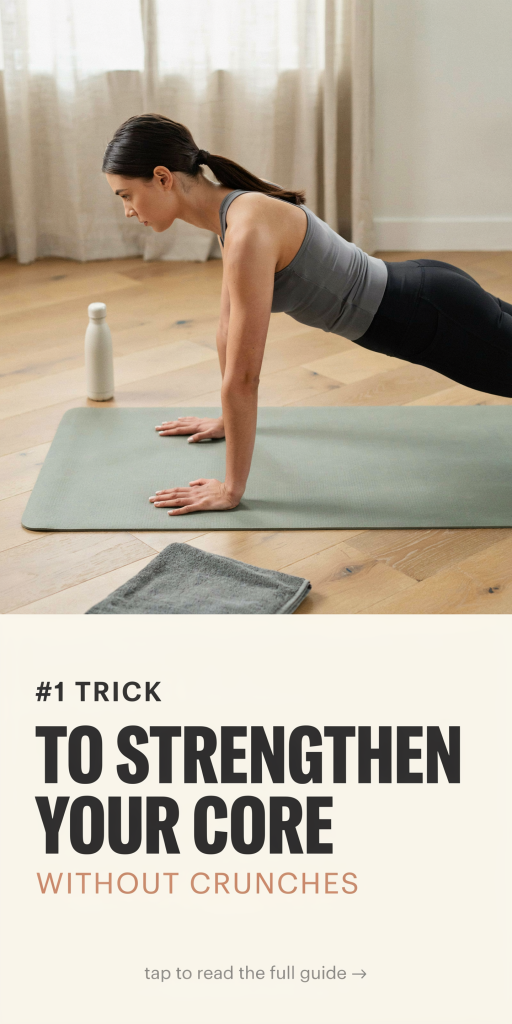
Baseline strict plank setup and cues:
- Position: Forearms shoulder-width, elbows under shoulders, feet hip-width or slightly wider for stability. Spine neutral, no sagging hips, no butt-up position.
- Tension: Create a “long line” from head to heels. Think of squeezing glutes and quads to lock the hips, and gently drawing the ribs toward the pelvis to avoid arching.
- Breathing: Breathe steadily. We brace by exhaling slightly and resisting the urge to hold breath entirely. A consistent inhale-exhale pattern preserves diaphragm function and keeps intra-abdominal pressure balanced.
- Checkpoints: Neck neutral (eyes down a few inches ahead), shoulders packed (not shrugged), posterior chain engaged.
Performing the hold:
- Start with sets of 20–45 seconds based on baseline ability. Instead of maxing out, end each set 1–2 seconds shy of failure, this preserves technique and allows consistent progress.
- Rest 60–90 seconds between sets. Use 3–5 sets depending on overall training volume.
When to step up: Once we’re comfortably completing 3 sets at the target duration with perfect form on two consecutive workouts, consider the next challenge.
Safety tips:
- Avoid lumbar sag at all costs. Sagging transfers load into passive structures.
- If we feel pain (sharp or radiating), regress immediately and consult a professional if it persists.
- Progress slowly with load, adding weight for a plank should only come after mastering bodyweight control and breathing.
Below, we’ll outline practical regressions and progressions so everyone can follow the exact steps that match their current capacity and goals.
Regressions For Beginners (Knee Plank, Incline, Short Holds)
Regressions For Beginners (Knee Plank, Incline, Short Holds)
Not everyone starts with a perfect full plank, and that’s fine. The goal is quality tension and safe alignment. Here are effective regressions that allow us to build strength without compromising form.
Knee plank
- Execution: From a standard plank position, lower the knees to the ground while keeping a straight line from head to knees. Maintain core tension and the same breathing pattern.
- Why it helps: Reduces lever arm and load on the shoulders and lower back while teaching bracing and rib-to-pelvis control.
- Programming: 3–5 sets of 20–60 seconds. Progress by increasing hold time or moving to shorter rest.
Incline plank (hands on bench or wall)
- Execution: Place hands on a stable elevated surface, bench, box, or wall, feet on the ground. Keep shoulders over wrists and maintain a neutral spine.
- Why it helps: Adjusts loading through the shoulders and core, allowing longer practice with less fatigue.
- Programming: Use for higher-rep endurance sessions or as a warm-up for stronger holds.
Short holds and accumulative time
- Micro-sets: Instead of forcing long static holds, accumulate total time. For example, do 6 sets of 20 seconds with 30–60 seconds rest to reach 2 minutes total.
- Why it helps: Builds conditioning while preserving technical quality. It’s easier to maintain perfect form in shorter efforts.
Cue coaching for regressions
- Maintain the same bracing cues: ribs down, glutes and quads on, breathe regularly.
- When fatigue causes form loss, stop the set. We’d rather do 8 perfect 20-second holds than 2 sloppy 60-second ones.
Progression plan from regression to full plank
- Week 1–2: Master knee planks and incline holds, accumulating 2–3 minutes total per session across sets.
- Week 3–4: Transition to partial full-plank holds (alternating 10–20 seconds knees, 10–20 seconds toes) until hip and shoulder control improves.
- Week 5+: Consolidate by doing full planks for short holds and gradually increase time.
These regressions keep training safe and productive. They build the tension habits we’ll rely on when moving into tougher variations.
Programming: Sets, Frequency, Progressive Overload And Tracking
Programming a plank progression is straightforward but requires discipline. We recommend treating the core like a muscle group with measurable targets, progressive overload, and appropriate frequency to stimulate adaptation without overtraining.
Frequency
- Beginners: 2–3 dedicated core sessions per week (or include planks in warm-ups) works well. We want total weekly volume that allows adaptation, aim for 6–10 total minutes of high-quality plank time across the week.
- Intermediate/Advanced: 3–4 times per week, mixing intensity (heavy/short vs long/endurance) can produce steady gains.
Sets and duration
- Endurance-focused: 3–5 sets of 45–90 seconds for each plank variation. Accumulate time across sets rather than chasing single maximal holds that break form.
- Strength/tension-focused: 3–6 sets of 10–30 seconds of maximal-tension planks (RKC or weighted).
Progressive overload strategies
- Time progression: Increase hold times gradually, 5–10 seconds every 1–2 workouts depending on baseline.
- Load progression: Add small weight increments (2.5–5 lbs) for weighted planks only after perfect bodyweight control.
- Complexity progression: Move from bilateral to unilateral variations, or add instability and dynamic components.
Tracking
- Keep a simple log: date, variation, sets, hold times, and perceived RPE. Track when we can hit our target sets and durations across two consecutive sessions before increasing load or time.
- Use objective markers: If we can do 3 sets of 60 seconds strict planks with perfect form, that’s a milestone for progression.
Sample 8-week plan (practical)
- Weeks 1–2: 3x/week: 4 sets of 30s knee or incline planks. Total weekly time ~6 minutes.
- Weeks 3–4: 3x/week: 4 sets of 45s full planks. Add one instability set (plank shoulder taps, low volume).
- Weeks 5–6: 3–4x/week: Mix 2 sets of 60s planks + 3 sets of 20s RKC planks or single-arm holds. Introduce light weighted vest on one session.
- Weeks 7–8: 3–4x/week: 2 heavy sessions (weighted/RKC) + 1 long endurance session (2–3 sets of 90s). Add dynamic anti-extension work (rollouts, carries).
Recovery and integration
- Treat heavy plank sessions like other intense work, ensure 48 hours before repeating maximal tension efforts.
- Integrate planks alongside compound training. We don’t need to isolate core every day, pair planks with lower-intensity mobility or conditioning on off days.
By tracking simple metrics and following progressive overload, time, load, complexity, we ensure consistent gains. The progression is not glamorous, but it’s effective.
Common Mistakes, Form Cues, And Quick Corrections
Even with a solid plan, small technical errors sabotage progress. Here are the most common mistakes we see, and the quick corrections that fix them.
Common mistakes
- Lumbar sag: Hips drop and lower back caves, creating unwanted shear on the spine.
- Elevated hips: Butt too high, reducing core demand and turning the plank into a hollow hold.
- Breath-holding: Breath is held or shallow, reducing diaphragm and pelvic floor coordination.
- Rounded or shrugged shoulders: Shoulders creep up toward the ears, stressing the neck and reducing shoulder stability.
- Asymmetry during single-arm or single-leg variations: Hips twist or dip, indicating insufficient anti-rotation control.
Quick corrections and cues
- Fix sagging hips: Cue “ribs to hips” and “brace like you’re about to get punched.” Activate glutes and quads to create a rigid line. If sag persists, regress to knees or incline and rebuild.
- Fix elevated hips: Cue “long line” and imagine sliding your chest forward. Engage lats and posterior chain: lower the focal point of tension.
- Restore breathing: Practice diaphragmatic breathing in plank, inhale through the nose into the belly, then exhale while bracing. Don’t clamp the throat.
- Shoulder packing: Cue “push the ground away” or “spread the floor” with forearms/hands to engage the scapular stabilizers and lower the shoulder girdle.
- Manage rotation: For asymmetry, regress to bilateral holds and strengthen oblique anti-rotation patterns (pallof presses, half-kneeling anti-rotation holds) before re-attempting single-arm variations.
Form check routine (60–90 seconds)
- Do a slow 10-second rehearsal: Get into plank, adjust alignment, breathe deliberately, feel tension points.
- Use mirrors or video: A quick side view exposes sagging or hip hiking. Front-on camera helps detect asymmetry.
- Coach hands-on: If possible, a light tap on the hips to give proprioceptive feedback helps correct sag or elevation.
When to seek help
- Pain that alters movement patterns or persists beyond 48 hours should prompt professional evaluation.
- Chronic inability to maintain a neutral spine even though regressions suggests mobility or motor control limitations, address with targeted breathing work, hip mobility, and posterior chain strengthening.
With these cues and a short checklist, we can fix most plank problems on the fly and keep the progression moving forward without wasted reps.
Conclusion
If we want a core that protects our spine, improves performance, and lasts, swapping crunches for a disciplined plank progression is the most efficient move we can make. The progression focuses on anti-extension, measurable overload, and consistent technique, three ingredients that produce meaningful change in eight weeks. Start where you are: use regressions until form is bulletproof, then add time, load, and complexity slowly. Track simple metrics, prioritize breathing and bracing, and correct common faults quickly. Do that, and we’ll have a stronger, stiffer, and more resilient core, no crunches necessary.